DigitConvert Scanner scanner negatives smartphone: 5 Best Tips
Remember those dusty boxes in the attic, filled with carousels of 35mm slides and strips of film negatives? They’re treasure troves of family history, capturing moments in a beautifully tangible, analogue format. But in our digital world, sharing and preserving these memories can feel like a challenge. This brings us to a simple, modern solution: the DigitConvert Scanner scanner negatives smartphone. In this review, we’re diving deep into the “Slide viewer Mobile Film Scanner 35mm, Slide scanner convert 35mm slides and negatives to digital photos using Your smartphone.” We’ve spent time with this device to see if it’s a genuinely practical tool for bringing your old memories back to life without the high cost and complexity of professional-grade equipment.
Our goal is to provide a clear, objective look at how this gadget works, who it’s best for, and our top tips for getting the most out of it.
Who Is the DigitConvert Scanner For (and Who Should Skip It)?
Understanding the target audience is key before investing in any piece of tech.
This slide scanner is an excellent choice for:
- The Casual Hobbyist: If you have a few hundred slides or negatives and want a fun, weekend project to digitize them for social media or family sharing, this is a perfect starting point.
- Families on a Budget: Professional scanning services can be costly, especially for large collections. This device offers a low-cost entry into the world of film digitization.
- Tech-Savvy Smartphone Users: If you’re comfortable with your phone’s camera and enjoy trying new apps, you’ll find the process intuitive and rewarding.
- Those Seeking Simplicity: You don’t need a computer, complicated software, or special drivers. The whole operation runs through your smartphone.
This might not be the right tool for:
- Professional Archivists or Photographers: If you require museum-quality, high-resolution scans with perfect colour accuracy for professional printing, a dedicated high-end scanner (like an Epson or Plustek) is necessary.
- Users with Thousands of Slides: The manual process of scanning each slide one by one can be time-consuming. For massive archives, a scanner with an automatic feeder would be more efficient.
- Those Uncomfortable with Smartphone Apps: The quality of your final image relies heavily on the app you use for capturing and editing. If fiddling with app settings isn’t your thing, a standalone scanner with built-in software might be a better fit.
Product Overview: DigitConvert Mobile Film Scanner
Before we dive into our detailed review and tips, here’s a quick summary of what the DigitConvert scanner offers.
| Feature | Description |
|---|---|
| Product Name | DigitConvert Slide viewer Mobile Film Scanner 35mm |
| Standout Features | Uses your smartphone’s camera for scanning; built-in LED backlight; supports 35mm slides and negatives. |
| Materials | Lightweight ABS Plastic |
| Size & Weight | Compact, foldable design for easy storage and portability. Very lightweight. |
| Key Highlights | Battery-powered for use anywhere. No computer or complex software needed. An affordable digitization solution. |
| Price | Check the latest price on Amazon |
Now, let’s get into the details with our five best tips for using the DigitConvert Scanner scanner negatives smartphone.
Tip 1: Nail the Setup – A Closer Look at Design and Build
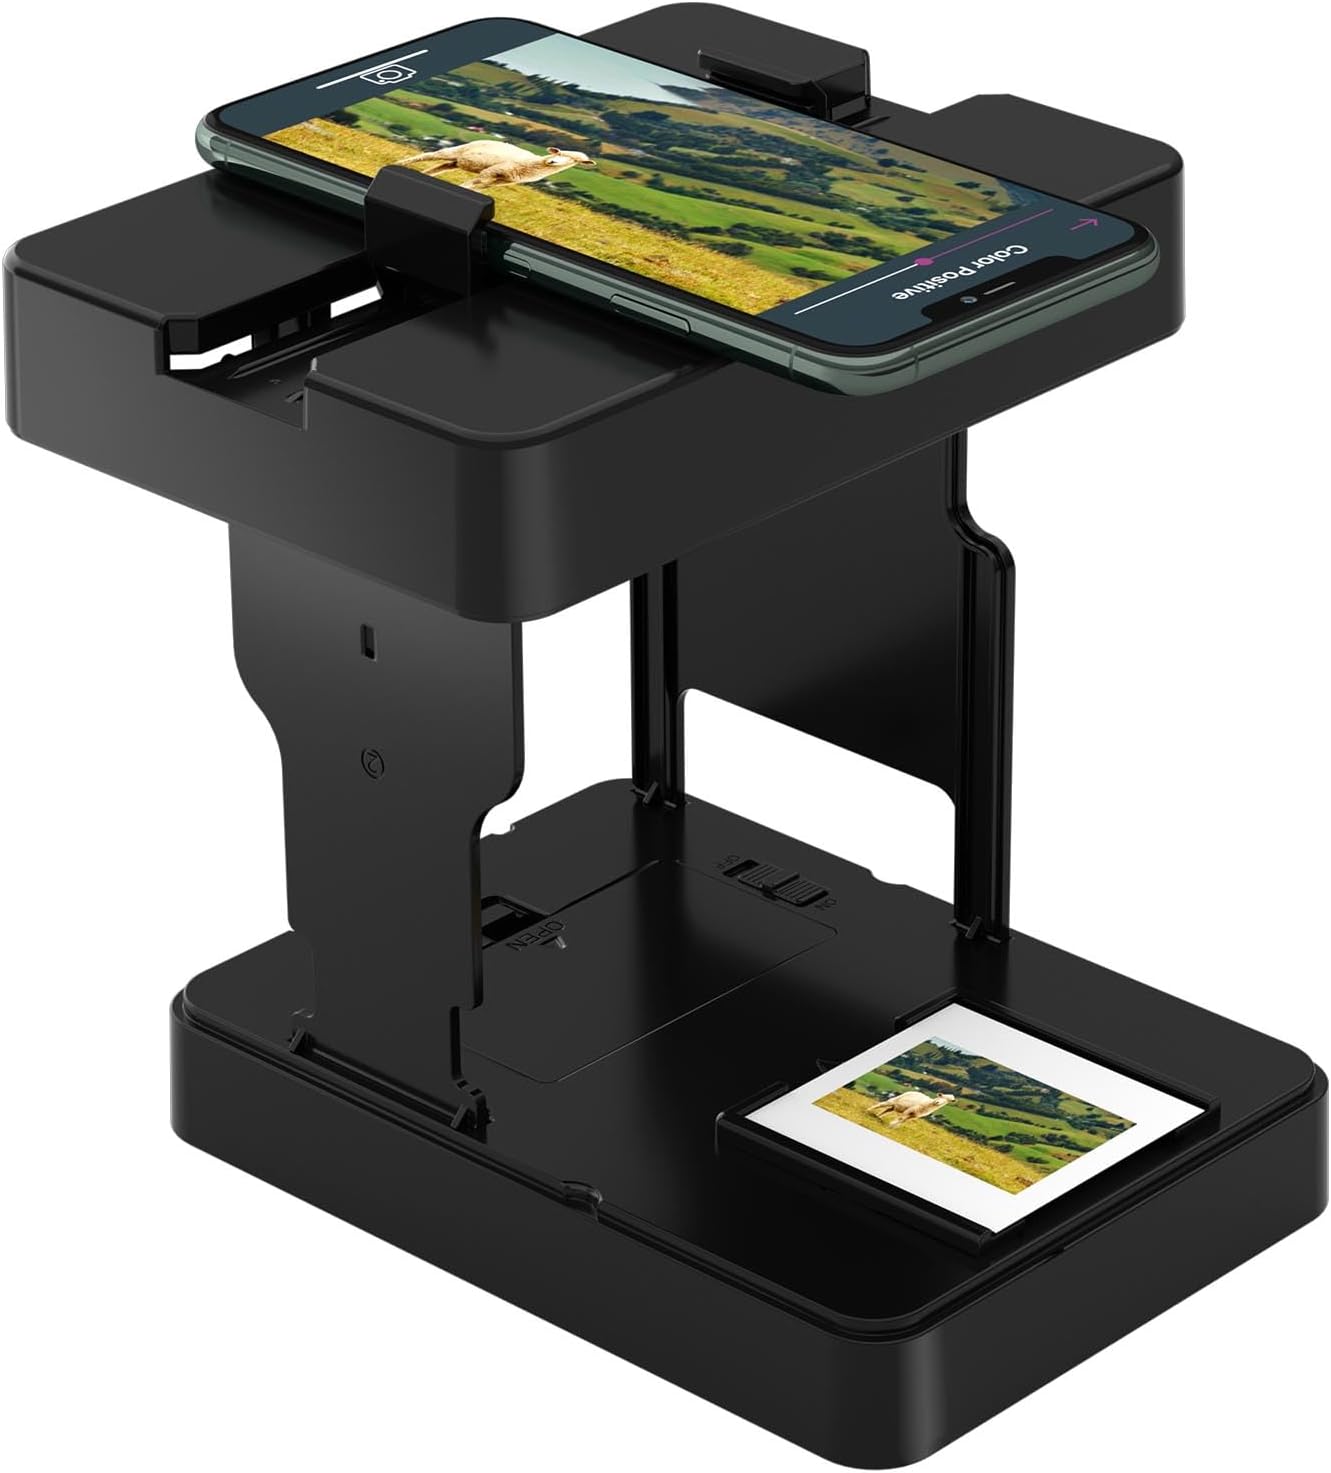
The first thing you’ll notice about the DigitConvert scanner is its simplicity. It’s a lightweight, foldable box made primarily of ABS plastic. This isn’t a premium, heavy-duty piece of equipment, but it’s not meant to be. Its design prioritizes portability and ease of storage.
Appearance and Design:
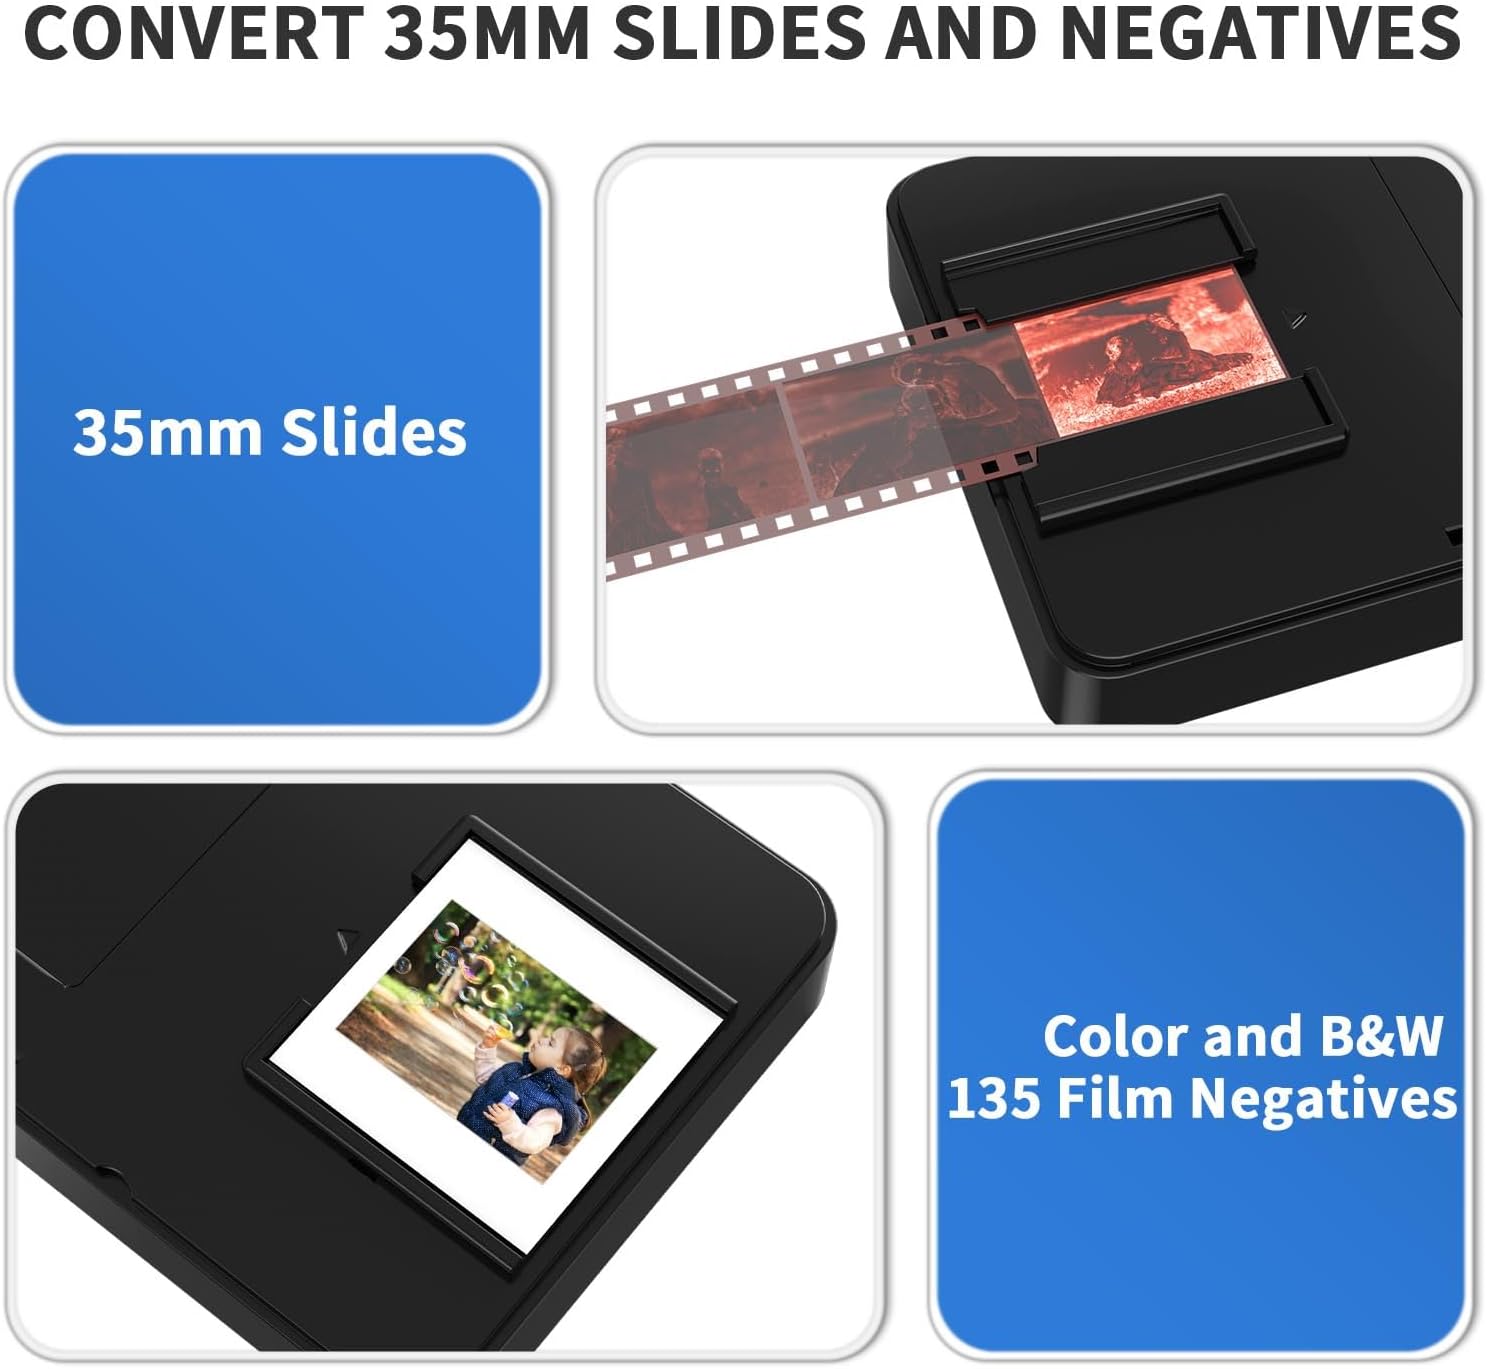
Out of the box, it unfolds into a small stage for your film. At the bottom is a diffused LED light panel, which is powered by two AA batteries (not included). On top is a platform with a hole for your smartphone’s camera lens. The kit includes two trays: one for mounted 35mm slides and another for 35mm film negative strips. The design is functional and intuitive.
Getting Started:
Setting it up is a breeze. Unfold the scanner, pop in the batteries, and press the button on the side to turn on the backlight. This simple setup is a common feature among devices in this category, and many users looking for a digitnow film scanner manual or digitnow film scanner instructions will find the process here almost identical and self-explanatory.
Our Tip: Before your first scan, ensure you are on a flat, stable surface. Any wobbling will translate into blurry photos. Also, use fresh, high-quality batteries to ensure the LED backlight is consistently bright and a an even light source, which is crucial for good-quality scans.
Tip 2: Your Phone is the Brain – Maximizing Performance and Features

This is where the magic—and the main variable—of the DigitConvert Scanner scanner negatives smartphone comes into play. The device itself is simply a lightbox and a holder. The actual “scanning” is performed by your smartphone’s camera. This is both a pro and a con.
Performance:
The quality of your digital image is directly tied to the quality of your phone’s camera. A modern flagship phone (like a recent iPhone, Google Pixel, or Samsung Galaxy) with a high-megapixel sensor and advanced image processing will yield significantly better results than an older, budget model. The built-in LED provides a decent, even light source, which is essential for capturing the details in the film.
Many people search for a digitnow 135 film negative scanner high resolution slide viewer, and it’s important to understand that with this device, the “high resolution” component comes from your phone, not the scanner itself. You can capture images at 12, 24, or even 48 megapixels, depending on your device.
Our Tip: Don’t just point and shoot. Use your phone’s pro or manual mode if it has one. Lock the focus on the slide or negative to ensure it’s perfectly sharp. You may also want to slightly lower the exposure to prevent the bright parts of the image (highlights) from being blown out.
Tip 3: The App is Your Darkroom – Ease of Use and Software
Because this isn’t an all-in-one device, you’ll need a companion app. The product doesn’t come with its own dedicated software, which offers you flexibility but also requires a little research. This is a key point we see in many a digitnow film scanner review for similar products.
Ease of Use:
The physical operation is incredibly simple: place a slide in the holder, slide it into the scanner, place your phone on top, and capture a photo. The real learning curve is in managing the app. For slides, you can often just use your phone’s native camera app and then crop the image.
For negatives, it’s more complex. You need an app that can invert the colours from the orange-masked negative into a positive image.
Our Tip (and where to look for software): Instead of searching for a specific digitnow film scanner software download or digiscan film scanner software, head to your phone’s app store and search for “film scanner” or “negative scanner.” Popular and effective options include:
- FilmBox by Photomyne: This is one of the most popular apps, using smart algorithms to detect, crop, and invert negatives automatically.
- Photo Negative Scanner: A simple and effective app that offers real-time inversion.
- Your Phone’s Built-in Editor: You can also take a picture of the negative and use the “curves” or “invert” tool in your phone’s photo editor (like Snapseed or Lightroom Mobile) for more manual control. Experimenting with these is key to finding your preferred workflow.
Tip 4: Cleanliness is Key – Troubleshooting Common Problems
Running into issues? Most problems with a slide scanne like this one are easily fixed. If you’re experiencing issues, this basic digitnow film scanner troubleshooting guide should help.
Common Issues & Solutions:
- Blurry Scans: This is almost always a focus issue. Tap your phone screen to focus precisely on the film grain. Also, ensure your phone’s lens and the slide/negative are perfectly clean.
- Dust and Scratches: The backlight will illuminate every single speck of dust. Use a small air blower and a microfiber cloth to gently clean your slides and negatives before placing them in the holder. This is the single most important step for getting clean images.
- Uneven Lighting or Dark Corners: Make sure your phone’s camera lens is perfectly centred over the hole. If it’s off-kilter, you may capture the edges of the scanner, resulting in vignetting (dark corners).
- Poor Colours: This is an app/editing issue. When you first invert a negative, the colours might look strange (often with a strong blue or cyan cast). Use the color balance or temperature tools in your scanning app or photo editor to correct it.
Our Tip: Batch your work. First, clean a batch of slides. Then, scan them all. Finally, sit down and edit the colours on all the digital files. This streamlined process is much more efficient than cleaning, scanning, and editing one slide at a time.
Tip 5: Assessing the Investment – Durability and Value for Money
The DigitConvert scanner is made of ABS plastic. It feels light but is sturdy enough for its intended purpose. The foldable design is a clever feature, protecting the light panel and making it easy to tuck away in a drawer. It’s not built to withstand rough handling, but with regular care, it should last through many digitization projects.
In terms of value, this device shines. Rather than spending hundreds on a dedicated scanner or on a professional service, you can get started for a very small initial investment. The final quality is surprisingly good for the price, provided you use a decent smartphone and are willing to do some minor editing.
To see if the current price makes sense for your budget, it’s always best to check the live listing.
Check the latest price on Amazon
Pros and Cons of the DigitConvert Scanner
| Pros | Cons |
|---|---|
| Highly affordable entry into film scanning. | Scan quality is entirely dependent on your smartphone’s camera. |
| Extremely portable and easy to store. | The plastic build is not designed for heavy-duty use. |
| Simple, intuitive concept—no drivers needed. | Requires a separate, third-party app for negative inversion. |
| Battery-powered for use anywhere. | The manual process can be slow for large collections. |
| Uses your existing high-quality phone camera. | Colour correction is often needed after scanning negatives. |
Alternatives to the DigitConvert Scanner
If you feel the DigitConvert Scanner scanner negatives smartphone isn’t quite right for you, a good alternative to consider is a standalone scanner like the Kodak Scanza.
- Kodak Scanza vs. DigitConvert: The Scanza is an all-in-one unit. It has its own screen, scans directly to an SD card, and doesn’t require a smartphone or computer. It offers more convenience and consistent results out of the box. However, it comes at a significantly higher price point and its fixed-resolution sensor might not match the quality of a top-tier smartphone camera. The DigitConvert offers more flexibility and higher potential resolution for a fraction of the cost.
Frequently Asked Questions (FAQs)
1. Does this scanner require a computer to work?
No, it operates entirely with your smartphone. You capture the images on your phone, and from there you can edit them and share them directly.
2. What kind of batteries does it use?
It typically requires two AA batteries to power the LED backlight. Always check the product listing for the most current specifications.
3. Can it scan photo formats other than 35mm?
No, this device is specifically designed with holders for 35mm mounted slides and 35mm film negative strips. It will not work for 110, 120 (medium format), or other film sizes.
4. How do I get a normal-looking photo from the orange negative film?
You will need a smartphone app designed for this purpose, such as FilmBox or Photo Negative Scanner. These apps have a function to “invert” the image, which digitally reverses the colours and brightness to create a positive photo. You can then use the app’s editing tools to fine-tune the colours.
Conclusion: A Smart Solution for Nostalgic Projects
The DigitConvert Scanner scanner negatives smartphone is a clever, accessible, and highly affordable tool. It successfully bridges the gap between old analogue media and the modern digital world by leveraging the powerful camera you already carry in your pocket.
It’s not a replacement for a professional scanner, and it requires a bit of patience and a willingness to use smartphone apps. However, for anyone looking to digitize old family slides for sharing, archiving, or simply taking a trip down memory lane, this device delivers excellent value. It makes the process fun, interactive, and rewarding. If you’re ready to unlock the memories stored in your old film, this might be the perfect tool for the job.
Check the latest price on Amazon and see if this slide scanner fits your needs.
As an Amazon Associate, I earn from qualifying purchases.